About the game
The rules of the cave
Everything that decides whether your ship survives and how your score adds up. If you only read one thing: ride steady, and the rest takes care of itself.
The idea
Pain Cave Arcade is a vertical space shooter you play on an indoor bike. You steer with a controller, and your legs run the ship.
You pick a target power, and the game compares your trainer's watts with that target many times a second. Two systems turn the result into gameplay: the Reactor measures how close you are, and Flow measures how steady you are.
Enemy waves are not there to make you sprint. Surging when things get hectic is exactly what breaks your score, which is the point. The game rewards the discipline that makes Zone 2 work.
Reactor: stay close to target
The Reactor runs from 0 to 100%. It charges toward a level set by how far you are from your target, and reacts in under a second. Ride exactly on target and it reaches 100%. Past a limit set by your difficulty mode, it empties.
The Reactor powers two things:
- Laser fire rate. 100% at a full Reactor, sliding down to 20% when empty. You can always shoot, just not much.
- Hull repair. Up to 3 HP per second at a full Reactor, and nothing when empty.
TRY IT
Reactor charge at a steady distance from your target
- Off target
- 20 W
- Reactor
- 90%
- Laser fire rate
- 92%
- Hull repair
- 2.7 HP/s
In zone: inside Athlete's 22 W cushion (the shaded band). Keep your power even and Flow climbs to x5.
Flow: stay steady
Flow is your score multiplier, running from x1 to x5. It climbs only when two things are true at once:
- You're in zone. Your power is within your mode's cushion of the target.
- You're steady. The variation in your power over the last 30 seconds is below your mode's limit.
Meet both and Flow reaches x5 in about 8 seconds. Miss either and it drops to x1 in about 1.5 seconds. That lopsided timing is deliberate: multipliers are earned slowly and lost quickly.
Surges linger. Because steadiness looks back 30 seconds, a hard surge stays on your record after you settle. Your Reactor recovers right away, but Flow can sit at x1 for up to 30 seconds until the surge ages out.
Points
You score in two ways, and most of your points come from riding.
Ride points = 1 per second x your Flow multiplier
Kill points = the full hull value of what you destroyed
| Source | Points |
|---|---|
| Riding at Flow x1 | 1 per second |
| Riding at Flow x5 | 5 per second, or 300 per minute |
| Small asteroid | 1 |
| Large asteroid | 2 |
| Enemy ship | Its full hull value (see below) |
| Interval boss | 120 |
- Flow multiplies ride points only. It does not multiply kills.
- Double Points doubles both for 30 seconds, for a peak of 10 ride points a second.
- Points stop during pauses, countdowns, and the game over screen, so a bathroom break costs nothing.
- Your score carries through deaths. One ride is one score, however many ships you lose.
WORKED EXAMPLE
Twenty minutes at an average of x4 is 1,200 seconds x 4 = 4,800 ride points. A Round 5 Cruiser is worth 160, the same as 32 seconds at x5. Grab a Double Points drop first and that kill pays 320. Kills help, but a steady hour beats any single fight.
Difficulty modes
Modes change how exact you have to be. They don't change the enemies or what anything is worth. Choose on the connect screen with M, or switch mid-ride from the pause menu. Your mode is saved with your score.
| Mode | Reactor empties at | In-zone cushion | Steady below | Built for |
|---|---|---|---|---|
| Arcade | 120 W off | 42 W either side | 18 W of variation | Gamers who ride |
| Athlete | 72 W off | 22 W either side | 11 W of variation | The default |
| Sim | 34 W off | 9 W either side | 6 W of variation | Riders who want it exact |
What that means for your Reactor at a steady distance from target:
| Mode | 10 W off | 25 W off | 50 W off | 75 W off |
|---|---|---|---|---|
| Arcade | 97% | 89% | 71% | 48% |
| Athlete | 97% | 85% | 48% | 0% |
| Sim | 95% | 54% | 0% | 0% |
Power zones and FTP
Your target comes from your FTP, roughly the power you could hold for an hour. The game starts at 240 W, so set yours on your first ride with O and P, or up and down on the D-pad. It's saved for your account in this browser, so it's still there next time.
The default target is Endurance, the classic Zone 2. You can move it between Recovery and Threshold at any time. Each zone has a single target wattage near its middle, and that number is what the Reactor measures against.
| Zone | % of FTP | Target | At 240 W FTP |
|---|---|---|---|
| Recovery | Under 55% | 40% | 96 W |
| Endurance | 55 to 75% | 65% | 156 W |
| Tempo | 76 to 87% | 81% | 194 W |
| Sweet Spot | 88 to 94% | 90.5% | 217 W |
| Threshold | 95 to 105% | 99.5% | 239 W |
Your power readout changes color to help: green means you're in the target zone, yellow is one zone above, blue is one zone below, and red is further away.
Heart rate governor
Hold the same watts for an hour and your heart rate creeps up anyway. This is cardiac drift, and it can turn a Zone 2 ride into a Zone 3 ride without a single extra watt. The governor corrects for it.
Connect a strap and the game steers your target power to keep you at a target heart rate. If your heart rate runs high, it trims your target by up to 50%. If it runs low, it raises your target by up to 50%. It ignores small changes of 2 bpm or less, cuts within seconds, and restores more slowly.
The target starts at 125 bpm. Set your own with the ; and ' keys, or the game will steer you toward 125. Like your FTP, it's saved in this browser. With no strap connected, the governor stays off and your target is just your zone.
Rounds and the shop
Each round runs on a timer. Survive it and you reach the shop, then the next round begins. Rounds grow from two minutes to a ten-minute maximum, so a 45-minute ride takes you into about Round 8.
| Round | 1 | 2 | 3 | 4 | 5 | 6 | 7+ |
|---|---|---|---|---|---|---|---|
| Length | 2:00 | 3:30 | 5:00 | 6:30 | 8:00 | 9:30 | 10:00 |
Every new round gets harder:
- Enemy ships arrive 10% more often, up to a limit.
- Enemy hulls grow by 15% of their base value, with no limit.
- Asteroids fall faster and more often, with an extra jump entering Round 3.
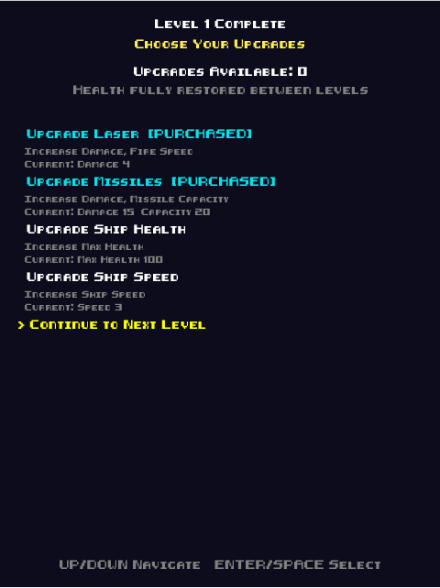
The shop
You get two upgrades per shop, and can't buy the same one twice in a visit. Your hull is also fully repaired before the next round.
| Upgrade | Effect |
|---|---|
| Laser | +10% damage and slightly faster fire |
| Missiles | +10% damage and capacity, plus a full refill |
| Ship health | +10% maximum hull |
| Ship speed | +10% movement speed |
Enemies
Your ship starts with 100 HP. Small asteroids take 10 and large ones take 20, so watch what's falling. Ships arrive at random, at about these rates in Round 1.

Scout
Weaves side to side on the way down.
About every 30 s. 10% chance of dropping a power-up.

Fighter
Fast. Drops low, then patrols across the screen.
About every 60 s. 10% chance of dropping a power-up.

Heavy Fighter
Two hardpoints and a much tougher hull.
About every 2 min. 50% chance of dropping a power-up.

Cruiser
Slow, with four hardpoints firing lasers and torpedoes.
About every 4 min. 50% chance of dropping a power-up.
A ship's hull is also its point value, so ships are worth more the longer you survive:
| Hull and points | Round 1 | Round 3 | Round 5 | Round 10 |
|---|---|---|---|---|
| Scout | 10 | 13 | 16 | 23 |
| Fighter | 30 | 39 | 48 | 70 |
| Heavy Fighter | 50 | 65 | 80 | 117 |
| Cruiser | 100 | 130 | 160 | 235 |
Power-ups
Destroyed ships can drop a power-up where they die. It falls down the screen, and you collect it by flying close. Going after one means leaving a safe spot, so choose your moment.
| Power-up | Effect | Scout, Fighter | Heavy, Cruiser |
|---|---|---|---|
| Double Points | Doubles every point you earn for 30 seconds, ride points and kills alike. | 52% | 24% |
| Laser Overcharge | Doubles your laser fire rate for 30 seconds. | 17% | 24% |
| Infinite Missiles | Seekers and drones cost nothing for 30 seconds. | 4% | 12% |
| Restock | Instantly refills your missile count. | 26% | 40% |
The percentages show what a drop will be, once a ship drops anything. They're rounded, so they may not add up to exactly 100.
Weapons
Your laser is free. Everything else draws from one shared count, shown as Missiles on your HUD, which starts at 20. Each seeker or drone costs one.
Dual laser
Space / AHold to fire. Two bolts at 4 damage each, four times a second at a full Reactor. It never runs out of ammo, but it slows to a fifth of that rate as the Reactor empties.

Seeker missile
3 / BTracks the nearest enemy for 15 damage. Save these for heavy ships.

Guardian drone
1 / XLaunches a shielded escort that absorbs incoming fire.

Attack drone
2 / YLaunches a drone that fires at enemies on its own.
Structured workouts
Press W on the connect screen to swap free play for the VO2 Sample, a 40-minute workout where the game follows the session.
- Warmup and recovery are calm. No waves spawn.
- Steady blocks play like normal, with waves and Flow scoring.
- Intervals are boss fights. Four times, for four minutes at 110% of FTP, you face a 120 HP cruiser.
The boss can only be damaged while you're in zone. Out of zone your shots pass through it and it repairs 8 HP per second. Your ride summary marks each interval as a pass if you beat the boss, or a fail if you don't.
Ending a ride
If your hull hits zero, the game pauses and offers two choices on the keyboard. R starts a new run from Round 1 with full health and missiles, and keeps your score and upgrades. Q ends the workout.
When you're done, pause and choose End Workout. Your score goes to the leaderboard, and your browser downloads a FIT file plus a summary image for sharing. If you close the tab mid-ride, your score is still submitted.
| Ride summary | What it tells you |
|---|---|
| Time in Zone | Share of your active time spent within the cushion |
| Variability Index | Normalized power divided by average power. 1.00 is perfectly even. |
| Peak Multiplier | The highest Flow you reached |
| Avg Multiplier | Your average Flow over the ride |
If your trainer drops out, Reactor and Flow freeze after three seconds, with no penalty, while the game reconnects. If the browser crashes, the next launch offers your unsaved ride back.
Controls
Connect screen
| Action | Input |
|---|---|
| Connect trainer | 0 |
| Connect heart rate monitor | 1 |
| Connect controller | Press any button on it |
| Change difficulty mode | M |
| Switch to structured workout | W |
| Start the ride | Space |
| Tutorial | T |
| Download a recovered ride | G |
During a ride
| Action | Keyboard | Controller |
|---|---|---|
| Move | WASD or arrows | Left stick |
| Fire laser (hold) | Space | A / Cross |
| Guardian drone | 1 | X / Square |
| Attack drone | 2 | Y / Triangle |
| Seeker missile | 3 | B / Circle |
| Pause | Esc | View / Share |
| Target zone down, up | - and = | D-pad left, right |
| FTP down, up 5 W | O and P | D-pad down, up |
| Target heart rate down, up | ; and ' | Keyboard only |
| Trainer resistance 5% | [ and ] | LB, RB |
| Trainer resistance 15% | Shift + [ and ] | LT, RT |
On a Switch controller, buttons follow position, so the bottom button fires the laser. Trainer resistance needs a trainer that supports FTMS. The numbers on this page describe the current beta and may change as the game is tuned.
Ready to ride?
Sign in with Google, Apple, or email. Your 7-day trial starts right away.
Start free trial